Source Folders
Start by adding the source(s) you want to have backed up. There is no limit to the number of folders you can add BUT you can’t back up drives or folders that are not built into your PC such as USB drives or network locations. This limitation is due to the “Shadowing” that needs to occur to copy locked files. Also this program is designed to back up your important working files on your PC onto external locations and not the other way around.
If you want to backup an entire drive just select the drive letter again keeping in mind it has to be a fixed drive that is in your PC and cannot be USB drives or network locations.
Folder Naming
Try not to use special characters in your folder names, as a rule of thumb don’t use any of the characters above the numbers on your keyboard. If you do it may create unexpected results.
Destination Folders
Again there is no limit to the number of locations but there are some other limitations.
To backup to a network location such as a Server, NAS or another PC use the full network path and not a mapped path. ie. use \network_or_ipbackup_folder instead of g:backup_folder. Using a mapped drive letter will ultimately fail to copy.
Use different folder names for each destination folder as this will affect your logs eg.If you have two destinations a USB and NAS. Instead of having a folder called “Backup” for both destinations use folder names such as “Backup_USB” and “Backup_NAS”. The reasons are explained further down in the “Logs” section.
Folder Naming
Try not to use special characters in your folder names, as a rule of thumb don’t use any of the characters above the numbers on your keyboard. If you do it may create unexpected results.
 Copy Options
Test Copy
This does exactly that. It will go through the whole process and even show you the data it will copy with summaries, and detailed logs but it won’t actually copy anything. This is a good place to start to make sure your settings are correct before doing a manual copy which could take hours.
Start
This will start the backup process with your current settings. Please use the test before using this to save time as once started it can take hours to run. You can force it to stop once started by using the “Stop” sign. If you stop mid backup it will notify you in the Error Messages section and also in your logs.
Daily Folders
This option is very important as it will create a folder with the current “Day” in front of the actual folder that is getting backed up ie Monday to Sunday depending on the option. With this option you can keep up to 7 days worth of data. So make sure you have enough space before using this option. ie if you run the backup Monday to Friday then you will need 5 times the amount of space that you are backing up with room to grow.

Daily Folder Option Example
Reminder

The Desktop Edition is designed for users who want to backup to External USB Drives that are not plugged in all the time so we’ve designed a reminder function.
Once you’ve selected the Source and Destination, tested it and made a first run copy of the entire data it’s time to set your reminder. Select the time and which days you want it to remind you then click “Set”. Once you’ve set your self a reminder you’ll see the “Reminder Set” notification next to the time.
Time
This is the time to be reminded to do your backup. Once the time and day comes around it will pop up with a reminder to do your backups. You can then plug in your backup drives and run your backups.
Days to Run
Options are:
- Friday Only
- Monday to Friday (5 days)
- Monday to Saturday (6 days)
- Everyday (7 days)
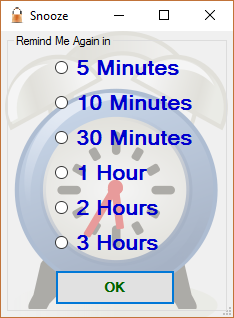
Snooze
Once your reminder pops up if you are not quite ready for the backup then you can “Snooze” it like an alarm clock and it will remind you again according to your options.

Log Files
It’s nice to have a good backup strategy but ultimately things can and will go wrong so it’s always a good idea to check the logs regularly just to make sure everything has gone to plan. There’s nothing worse than thinking the backups are done and taking it for granted only to come time to restore and find that it hasn’t worked for what ever reason.
File Naming
Please refer to Source and Destination above for naming limitations of folder names.
RoboCopy has an excellent built in detailed logging option but it can be overwhelming at times especially if you have lots of data as the logs can be very long. That’s why LocDN has an excellent summary log that you can quickly glance at. It gives you everything you need to know about the backup all in one easy to read file.
All log files are located in C:LocDNDesktopEdlogs and the detailed logs will use the following naming convention of “current_day dash source_folder dash destination_folder” this creates a unique file for each source / destination pair and allows for easy recognition when scanning for the files to study the logs.
It’s important to choose different destination folder names so that the first log won’t get overridden by subsequent logs with the same name.
example:
Source is “C:UsersLocDocuments”
Destination is “E:Backup_USB”
Output log file will be “Wednesday-Documents-Backup_USB.txt”
If there are spaces in the folder names it will remove the spaces.
ie “Locs Documents” and “Backup USB” will result in “Wednesday-LocsDocuments-BackupUSB.txt”

Sample Log File Naming

Sample Summary Log
As you can see in the sample summary log everything you need to know is easily seen
The summary is grouped into sections based on the destination.
To break down the summary you get the following:
- Start Day, Date and time
- The Destination(s) Drive or Folder(s)
- The Source(s) Drive or Folder(s)
- Time taken to backup each folder and the total amount of time taken to backup all folders
- It will also tell if it detected any errors during the backup
- Then finally it even gives you a summary of your disk space usage
You can compare the summary log above with just one file of the detailed log below.

Sample RoboCopy Detailed Log
Getting Updates
To make things easier for you we’ve built in an online updater program.
If you see the icon in the bottom left corner start waving like the image to the right it’s telling you that there’s an update for your program. Simply click it and follow the on screen instructions. When completed you will be running the latest update.

Deciphering Error Messages
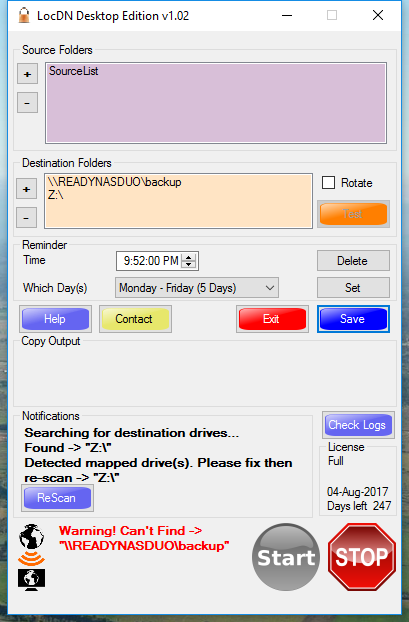
Every time the program starts up it will scan your computer for the “Destinations” that you have chosen. If your external USB is not plugged in then it will notify you with an error message and the “Start” button will be greyed out and unavailable until you plug the USB drive in or remove it from the list. Once you have corrected the issue, hit the “ReScan” button and it will re-scan your computer.
Using mapped network drives will also result in the program being unable to start. The reason for this is that RoboCopy doesn’t like to deal with network mapped drives.
To backup to a network location such as a Server, NAS or another PC use the full network path and not a mapped path. ie. use \network_or_ipbackup_folder instead of g:backup_folder. Using a mapped drive letter will ultimately fail to copy.